MitsuStyle MitsuStyle

Go Back   MitsuStyle > The Homefront! > Project Talk

Reply
 
Thread Tools Display Modes
Old 02-01-2010   #41
goodhart
Transmission destroyer
 
goodhart's Avatar
 

Join Date: Feb 2007
Location: Cambridge
Drives: G37, 91 TSi
Posts: 7,150
Send a message via MSN to goodhart
Re: 1990 Eagle Talon TSi AWD

Quote:
Originally Posted by caffeinetripp View Post
That's pretty obvious after replacing the plugs since it needed to be done anyway. No, no Iridiums just yet, just cheapo NGKs.

Just stick to the NGK BPR7ES.
__________________


Quote:
Originally Posted by scheides View Post
I swing from the nuts of cold hard data. Anything less is a guess.
goodhart is offline   Reply With Quote
Old 02-06-2010   #42
caffeinetripp
DSM's Dead
 
caffeinetripp's Avatar
 

Join Date: Apr 2007
Location: Duluth, Minnesota
Drives: '91 Dakokta
Posts: 65
Re: 1990 Eagle Talon TSi AWD

Quote:
Originally Posted by goodhart View Post
Just stick to the NGK BPR7ES.
Yep, that's what I got. Cheapo NGKs. $2.50 a plug.
__________________
'92 MX-3 KLZE Swap, I/H/E, battery relocate.
caffeinetripp is offline   Reply With Quote
Old 04-20-2010   #43
caffeinetripp
DSM's Dead
 
caffeinetripp's Avatar
 

Join Date: Apr 2007
Location: Duluth, Minnesota
Drives: '91 Dakokta
Posts: 65
Re: 1990 Eagle Talon TSi AWD

Got my HKS Type 1 Turbo Timer installed. Put in some better o-rings around the injectors. The last set we weren't sure whether or not they were fuel safe but we needed them as a quick fix.
We also found out that the 2G injector clips that were installed were done incorrectly at the wire. They wires were twisted together and held by electrical tape. Awesome. One of the wires came loose and my friend and I were wondering why the car was running so shittily, come to find out, that was the reason. Time for some solder. God, I love previous owner's and they're half-assed way of doing things.
__________________
'92 MX-3 KLZE Swap, I/H/E, battery relocate.
caffeinetripp is offline   Reply With Quote
Old 05-16-2010   #44
caffeinetripp
DSM's Dead
 
caffeinetripp's Avatar
 

Join Date: Apr 2007
Location: Duluth, Minnesota
Drives: '91 Dakokta
Posts: 65
Re: 1990 Eagle Talon TSi AWD

Nabbed some new pictures today of the car and painted the extra 2G manifold. Turned out pretty decent.


__________________
'92 MX-3 KLZE Swap, I/H/E, battery relocate.
caffeinetripp is offline   Reply With Quote
Old 05-17-2010   #45
goodhart
Transmission destroyer
 
goodhart's Avatar
 

Join Date: Feb 2007
Location: Cambridge
Drives: G37, 91 TSi
Posts: 7,150
Send a message via MSN to goodhart
Re: 1990 Eagle Talon TSi AWD

I hope you don't plan on having that paint stay on the manifold for long. Even if it is the "high temp" shit, it will still flake off in about 20 miles or less.
__________________


Quote:
Originally Posted by scheides View Post
I swing from the nuts of cold hard data. Anything less is a guess.
goodhart is offline   Reply With Quote
Old 05-17-2010   #46
caffeinetripp
DSM's Dead
 
caffeinetripp's Avatar
 

Join Date: Apr 2007
Location: Duluth, Minnesota
Drives: '91 Dakokta
Posts: 65
Re: 1990 Eagle Talon TSi AWD

Quote:
Originally Posted by goodhart View Post
I hope you don't plan on having that paint stay on the manifold for long. Even if it is the "high temp" shit, it will still flake off in about 20 miles or less.
More than likely. I don't think the curing of 500* is anything against the 1000*. But we'll see. Not a big deal if it flakes.
__________________
'92 MX-3 KLZE Swap, I/H/E, battery relocate.
caffeinetripp is offline   Reply With Quote
Old 05-24-2010   #47
caffeinetripp
DSM's Dead
 
caffeinetripp's Avatar
 

Join Date: Apr 2007
Location: Duluth, Minnesota
Drives: '91 Dakokta
Posts: 65
Re: 1990 Eagle Talon TSi AWD

Car's knocking. Pretty bad. Seeing what might be the problem. In the meantime, fixed the boost leak at the J pipe, gave her another nice wash and wax today.
Finally getting the alignment done tomorrow as I've got some extra cash. Now just to save for the tires that are definitely needed. After that, time for some brakes, pretty sure the back ones are warped and the fronts are getting pretty skimpy on the brake meat. Next up: Save for the MAP tune. Anyone happen to know what they charge per hour of tuning?
__________________
'92 MX-3 KLZE Swap, I/H/E, battery relocate.
caffeinetripp is offline   Reply With Quote
Old 05-24-2010   #48
goodhart
Transmission destroyer
 
goodhart's Avatar
 

Join Date: Feb 2007
Location: Cambridge
Drives: G37, 91 TSi
Posts: 7,150
Send a message via MSN to goodhart
Re: 1990 Eagle Talon TSi AWD

Shane @ DB tune FTW. He has a flat rate, $300 or $350 for DSM's last time I was there
__________________


Quote:
Originally Posted by scheides View Post
I swing from the nuts of cold hard data. Anything less is a guess.
goodhart is offline   Reply With Quote
Old 05-24-2010   #49
caffeinetripp
DSM's Dead
 
caffeinetripp's Avatar
 

Join Date: Apr 2007
Location: Duluth, Minnesota
Drives: '91 Dakokta
Posts: 65
Re: 1990 Eagle Talon TSi AWD

Not half bad. Gotta like the flat rates, but how far does he tune? Until it's perfect? or just fine for street? Either way, that's a good price.
__________________
'92 MX-3 KLZE Swap, I/H/E, battery relocate.
caffeinetripp is offline   Reply With Quote
Old 05-25-2010   #50
Kevin 1G Drummer
 
Kevin 1G Drummer's Avatar
 

Join Date: Nov 2005
Location: Cottage Grove
Drives: Silver '02 IS300, Blue '06 Suzuki SV1000
Posts: 5,293
Re: 1990 Eagle Talon TSi AWD

He'll tune it for as much power as the setup will safely make. He tuned my old DSM to 300 awhp and I daily drove it for about 2 years, not having to change a thing as far as the tune went.
__________________
'02 Lexus IS300
'06 Suzuki SV1000: Back on the road and ripping hard as ever!
Kevin 1G Drummer is offline   Reply With Quote
Old 07-05-2010   #51
caffeinetripp
DSM's Dead
 
caffeinetripp's Avatar
 

Join Date: Apr 2007
Location: Duluth, Minnesota
Drives: '91 Dakokta
Posts: 65
Re: 1990 Eagle Talon TSi AWD

I know this isn't much of a build for the time being, more of a replacement of shitty parts, but I got the ball joints done the other day, ran into a couple of problems.
the passenger side lower control arm has one huge rust hole in it, both front sway bar links are shit, and both of the LCA's bushings are cracked and worn pretty badly along with the driver's side axle spindle's threads being f'd which lead to die grinding and hoping that the castle nut will stay on, the passenger side boot is torn (not clicking yet though, thank god for quick boots).
Going to end up buying new LCAs through eBay, two for a bill and free shipping. Maybe swapping on some poly bushings (anyone use them for the LCAs?), replacing only the driver's side for now until I can scrounge up some money for the passenger side.
Pretty sure that the ball joints were factory. Well, definitely sure. I'll snag a picture just to show how shitty of condition they were in.
I also ordered in DME's kit, one more Eibach front camber adjustment, and OE rear camber bolts to get everything set in stone for alignment.
Bought some 17" 1999 Ford Mustang wheels wrapped in Continental ContiExtremeContact 245/45/ZR17s. They'll rub a tad so it leads to me learning how to roll fenders in the future. Only ran me $250 and there's still a decent amount of tread left on the tires which will definitely get me through winter. They're in pretty good condition as well, but I'll eventually paint them black, maybe with a small silver lip. I don't know if I'm going to be going with a gloss or a flat black, opinions?
__________________
'92 MX-3 KLZE Swap, I/H/E, battery relocate.
caffeinetripp is offline   Reply With Quote
Old 11-15-2011   #52
caffeinetripp
DSM's Dead
 
caffeinetripp's Avatar
 

Join Date: Apr 2007
Location: Duluth, Minnesota
Drives: '91 Dakokta
Posts: 65
Re: 1990 Eagle Talon TSi AWD


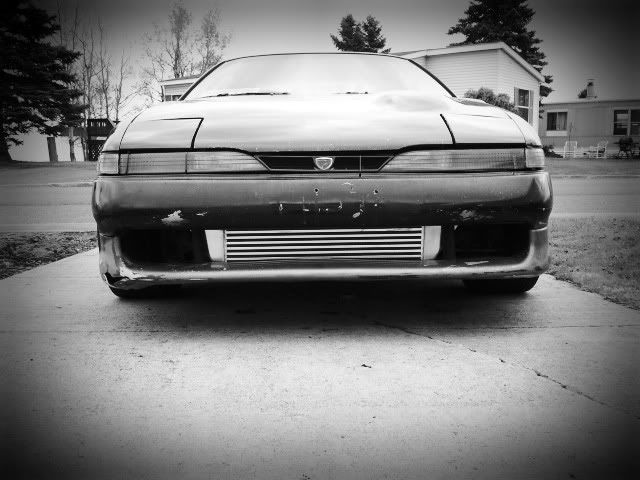
And there's the VR Speed Factory FMIC all done and ready. Sorry it took me so long to get a picture up, but there it is. Also, I didn't (shaaame) do a write up of everything. But for the most part, it's pretty self explanatory.

Cost: $325.00 Including Shipping (Did not purchase J-Pipe through VR Speed Factory)

Difficulty: 3/5

Time Required: 2 - 3 Hours

Tools Required: Basic hand tools, Dremel/Die Grinder, Drill with various bits, Tap and Die kit

Equipment: VR Speed Factory 1G Front Mount Intercooler kit (with or without J Pipe), gasket material, J Pipe gasket, BOV gasket, RTV, 36"-37" alternator belt.

Step 1: Remove Power Steering Cooler Lines (they run in front of the radiator).
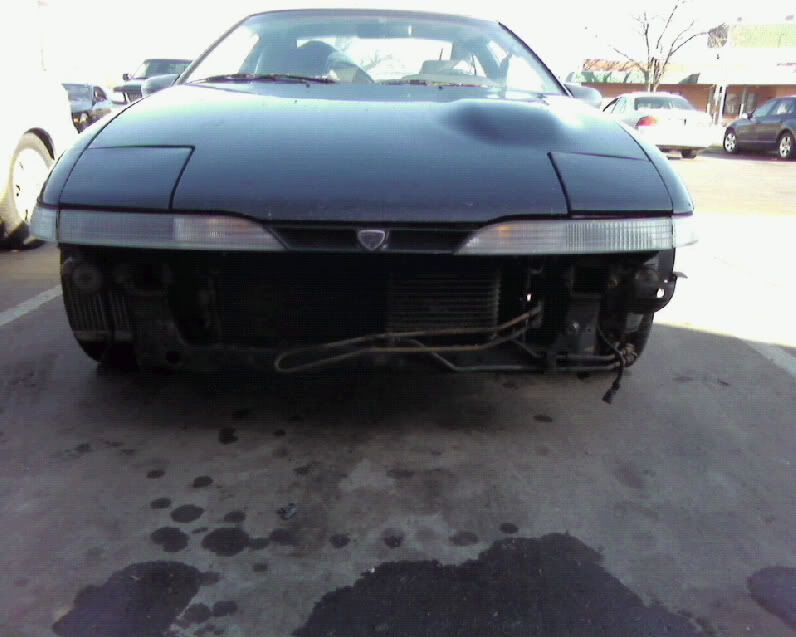

Step 2: Remove alternator belt and push alternator towards the firewall (now would also be a good time to clean up that rust corroded, oil and dirt filled alternator adjusting bolt).
Step 3: Remove headlights, grill (for us 1GA guys), sidemarkers, header panel bar (which runs from the hood release latch downward) front bumper cover, and crash beam (I don't have a crash beam, so that's negated :shock: )
Step 4: Remove OE intercooler piping, J Pipe, Throttle Body Elbow, and SMIC. There are three bolts on the SMIC; two are rather visible, the third is not.
Step 5: Position the intercooler at the front of the vehicle mocking up the location where you will have to cut the header panel. Using a permanent marker, stencil out where you need to cut using the Dremel/Die Grinder. It would be helpful to have a two friends hold the intercooler while you position it, but if need be, thighs do a good job of holding the intercooler.
Step 6: Cut out the parts of the header panel where you marked. The passenger side cold side piping coming off of the intercooler should point upwards more (thus having to cut out a different portion of the header panel) than the hot side intercooler pipe.
Step 7: Once the intercooler fits snugly through the holes that you have cut out (remove the coolant resevoir and position it aside), make sure the intercooler itself is level across, then mark holes on the left and right tabs (center tab too if you've got the header bar), and drill them out. I can't remember what size I drilled mine, but I know I didn't have a bit big enough so I had to tap the hole. In any case, it's easy to figure out if you've got the tap and die set, so have at it!
Step 8: Mount the intercooler to the crash bar mount.
Step 9: Remove the throttle body from the intake manifold as now would be an excellent time to clean it out. Make Throttle Body gaskets and use RTV to ensure a complete seal. Using the bolts and stud provided, mount the throttle body back in it's original position, attach the VRSF Throttle Body Elbow (may not clear for you ABS guys). Bolt everything together.
Step 10: Fab up the intercooler piping so you know what position it has to be in for future reference as the curved silicone couplers can be a pain in the ass to twist once connected to the intercooler.
Step 11: If your J Pipe didn't have a boost source welded onto it for your MBC, like mine, just bring it to your local weld shop and have them put one on. Shouldn't cost much. Or, you can do what I did, tap and die the J Pipe and toss in a bleeder valve (or something to that effect) don't forget to put threadlock on the threads.
Step 12: After everything is done and fabbed up to fit snugly, begin tightening all of the T-Bolt clamps.
Step 13: Put the BOV, intake pipe, and reconnect any connections that may have been removed along with vacuum lines.
Step 14: Put on the new alternator belt. It will be hard to get over the alternator pulley (but if you've got an underdriven alternator pulley, it'll be easier).
Step 15: Double check all of the T-Bolt clamps, connections to the Throttle Body and MAF, vacuum lines, etc. Wait approximately half an hour for everything to dry (if you used the RTV and the threadlock).

The Gain: Besides the obvious of having a better performing vehicle by keeping the intake temperatures down, and better flow throughout the intake system, you get a great looking front end, a very audible turbo spool, and a happy vehicle.

Suggestions: I'd highly recommend purchasing the VRSF J Pipe as well. No, it doesn't come with an MBC boost source, but that can be easily remedied by doing what I did or bringing the J Pipe to a body/auto shop to get a nipple welded on. It will keep the entire kit looking clean instead of having a mismatched part.
I wasn't too happy with the build quality, but the kit is a major step up from OE SMIC and rubber piping (minus the DeJon Tool UICP); there were aluminum chunks left on the interior of the UICP, the stability of the FMIC mounting flanges on the left and right do not seem strong, though the FMIC is light, they are quite bendable by hand, even so, I believe they'll do fine. Can always make a mount for the bottom part of the FMIC.
The Throttle Body Elbow was welded in an incorrect position, as per the OE throttle body mount. Still fit just fine though, just a little goofy looking.
Overall though, this kit is worth the money. Definitely worth the money. The guys at VRSF are very prompt in letting you know what's going on and answering any questions that you may have. The shipping company who VRSF was going through lost all of the FMIC kits. So they refunded us all shipping charges for it taking so long. No big deal. I also got an extra set of T Bolt clamps as well (8 used, 8 left over, 16 total).
__________________
'92 MX-3 KLZE Swap, I/H/E, battery relocate.
caffeinetripp is offline   Reply With Quote
Old 11-15-2011   #53
Goat Blower
aka Goodbye
 
Goat Blower's Avatar
 
Asteroids Champion! Beach Squirter Champion!
Join Date: Oct 2003
Location: under the car
Drives: Taylor Made R15
Posts: 7,765
Re: 1990 Eagle Talon TSi AWD

I don't know if a write up on a DSM FMIC install is really necessary. A google search will probably find a 100 of them, and that's just the ones that people haven't taken down by now.
__________________
2009 Corvette Z51-SOLD
1992 Mitsubishi Eclipse GSX-SOLD
2013 BMW Z4-Current summer hooptie
2017 GMC Yukon-Current winter hooptie

Goat Blower is offline   Reply With Quote
Old 11-15-2011   #54
turbotalon1g
 
turbotalon1g's Avatar
 

Join Date: Mar 2005
Location: Blaine, MN
Drives: '91 Automagic
Posts: 13,908
Send a message via AIM to turbotalon1g
Re: 1990 Eagle Talon TSi AWD

lol, i saw a lot of RTV usage in there.

Are you taking advice from Tom?
__________________
Aaron/brownman/big brown.
'91 Automagic.
'02 Z06
Please leave feedback - http://www.dsmtuners.com/forums/itrader.php?u=58309
turbotalon1g is offline   Reply With Quote
Old 11-16-2011   #55
caffeinetripp
DSM's Dead
 
caffeinetripp's Avatar
 

Join Date: Apr 2007
Location: Duluth, Minnesota
Drives: '91 Dakokta
Posts: 65
Re: 1990 Eagle Talon TSi AWD

Just around the TB elbow and TB gasket...and the BOV gasket. Just wanna make sure that there's no leaks there at all. Not convinced that the paper gaskets will hold up to the boost.

Figured I might as well get one up anyway, couldn't hurt.
__________________
'92 MX-3 KLZE Swap, I/H/E, battery relocate.
caffeinetripp is offline   Reply With Quote
Reply


Posting Rules
You may not post new threads
You may not post replies
You may not post attachments
You may not edit your posts

BB code is On
Smilies are On
[IMG] code is On
HTML code is Off


All times are GMT -5. The time now is 05:21 AM.


Powered by vBulletin® Version 3.8.4
Copyright ©2000 - 2025, Jelsoft Enterprises Ltd.